Cute Creative Valentine's Day Ideas
Lauren, age 19, California

Love is in the air, flowers are blooming, and everywhere you look the colors are red, pink and white. With Valentine's Day just around the corner everyone is scrambling to come up with the perfect gift, but you're thinking "I don't have any money". Well, you've come to the right place! Here are some creative but cheap, heartfelt ideas for your friends, family, and special someone.
Here is a list of ideas:
1. Make a Mixed Tape of your favorite love songs.
2. Scrapbook
3. Scavenger Hunt Picnic
4. Tissue Heart Picture
5. Homemade Lip Glosses
6. Valentine's Day Gel Candles
7. Fleece Blanket
8. Heart Necklaces
See bottom of page for links to my original sources.
Scrapbook
Girls, we all love making crafty type things, and especially with pictures, so here is a chance to do a bit with both. Why don't you make your special someone a scrapbook? It doesn't have to be extremely big. There are small 8x5 sized scrapbooks that you can use.In this scrapbook use pictures of the two of you, movie tickets from movies you've seen together, tickets from places you've been like Disneyland or Magic Mountain, little trinkets - anything that reminds you of you two being together.
This gift is one of the most heartfelt gifts anyone can give.
Scavenger Hunt Picnic
Get out your cameras and/or your craft boxes, girls. It's time to get creative. This is something that can be done many different ways to fit your needs and likings, but here are some ideas.First, you need to come up with a list of places you want to send your special someone to. Each place should have a special meaning and a clue to the next place to head. Make sure your clues aren't too difficult. Perhaps include a little rhyme or an abstract picture of the next spot. Don't make your scavenger hunt too long. On average there should be about 10-12 clues.
At the end of the scavenger hunt have your last clue lead to where you are at with a picnic spread. Have a nice little dinner and music going. You can have this place be a park, beach, or even your backyard if you would like.
Things to remember:
Don't place your clues somewhere they can get moved or stolen.
Don't bury things, and if you do make sure children are not around when you bury the item.
Some ideas:
Notes in a bottle
Trail of petals or string
12 roses with notes on each one
12 piece blank puzzle
Draw out a map
Tissue Heart Picture
Materials Needed:
Tissue Paper
Glue
Paint Brush
Construction Paper
Instructions:
Cut a variety of heart shapes out of tissue paper. In a small container, mix one part glue with one part water. Use a paint blush and spread glue on a piece of white paper. Arrange the tissue paper hearts on the glue as desired. Make the hearts overlap each other! Add the glue and hearts to one small section of the white paper at a time. Once your hearts are placed on the glue, add more glue as needed so the hearts are completely covered. When done, set aside and let the glue dry.
When the glue is dry, cut the white paper around the hearts. Leave about 1/4 inch of white showing around the edges. Mount your picture on black, pink, or purple paper.
Homemade Lip Glosses
Sweet Almond Lip Balm Recipe
1 1/2 oz beeswax pearls1 oz cocoa butter
1 1/2 oz shea butter
2 ozs. sweet almond oil
1-2 teaspoons flavor oil
1 teaspoon vitamin E liquid (optional, as a preservative)
Lip balm containers
In a very small pan, add the beeswax and melt over the lowest setting. Once melted add the cocoa butter chunks and shea butter, let melt, and then add the sweet almond oil. Heat through. Add the Vitamin E oil. Remove from stove and pour into a glass measuring cup for easy pouring into lip balm containers.
Add the flavor oil, or if you would like to make more than one flavor with this recipe, separate into different glass jars or cups and then add the flavor oils. Adjust the amount of flavor oil accordingly. Stir flavor oils in and pour into lip balm containers. If the mixture starts to harden, place in the microwave for a few seconds to re-melt and then pour.
Natural Peppermint Lip Balm Recipe
1 1/2 oz beeswax pearls1 oz cocoa butter
1 1/2 oz mango butter
1 oz. sunflower oil
1/2 oz. almond oil
1/2 oz. jojoba oil
1 teaspoon coconut oil
1-2 teaspoons peppermint essential oil
5-10 drops rosemary oil extract (ROE)
In a very small pan, add the beeswax and melt over the lowest setting. Once melted add the cocoa butter chunks and shea butter, let melt, and then add the sweet almond oil. Heat through. Add the Vitamin E oil. Remove from stove and pour into a glass measuring cup for easy pouring into lip balm containers.
Add the flavor oil, or if you would like to make more than one flavor with this recipe, separate into different glass jars or cups and then add the flavor oils. Adjust the amount of flavor oil accordingly. Stir flavor oils in and pour into lip balm containers. If the mixture starts to harden, place in the microwave for a few seconds to re-melt and then pour.
Cranberry Lip Gloss
1 tablespoon sweet almond oil10 fresh cranberries
1 teaspoon honey
1 drop vitamin E
1. Mix all the ingredients together in a microwave-safe bowl.
2. Microwave for a couple of minutes or until the mixture just begins to boil. (Bowl may also be heated in a pan of water on a stovetop.)
3. Stir well, and gently crush the berries.
4. Cool mixture for five minutes and then strain through a fine sieve to remove all the fruit pieces.
5. Stir again & set aside to cool completely.
6. When cool, transfer into a small portable plastic container or tin.
7. Apply a small amount onto your lips & remember to smile. :)
Valentine's Day Gel Candles
Things You'll Need
Glass container
Hot glue
Zinc core wick
Gel wax
Stainless steel pots
Liquid dye made for gel candles
Essential Oils
Steps
1. Choose a container for your gel candle. Glass shows off the gel best, but you can use any non-flammable container. Plan to have the wick at least 1 1/2 inches away from the sides.
2. Dribble a spot of hot glue on the bottom of the container.
3. Stick the wick tab onto the hot glue and let it cool. Use a zinc core wick. Cotton will absorb too much gel.
4. Cut the gel wax into small cubes. This will allow it to melt faster.
5. Put the wax into a stainless steel or glass pot and turn the heat on medium. Monitor the temperature carefully with a thermometer. Your goal is 200 degrees F.
6. Maintain a temperature of 200 degrees F until the gel is smooth and syrupy.
7. Use a liquid dye made for gel candles for optimum effect. Water-based and paste dyes won't mix, and color blocks used for regular wax candles may make the gel cloudy.
8. Add 1/4 teaspoon of essential oil or candle scent to the melted gel.
9. Remember that alcohol-based scents (such as vanilla) may cause cloudiness.
10. Check the gel. If it's cloudy, try melting a couple more cubes of gel in it. This sometimes helps.
11. Choose a level pouring surface where you can leave the candle to set.
12. Preheat the container to 150 degrees F to keep bubbles to a minimum.
13. Pour the wax into the container as if you're pouring beer - down the side to prevent bubbles. The higher the pouring temperature, the fewer the bubbles. Sometimes you want bubbles for effect, in which case you should let the gel cool to 175 degrees F before pouring.
14. Pull the wick up straight and center it.
15. Let the candle set for 4 hours.
16. Trim the wick to 1/4 inch.
Adding Decorations
1. Use anything that is not flammable: heart glitter, red sand, glass beads, marbles, glitter, candy hearts, artificial jewels or pearls, metal charms, etc.
2. Dip the items in the hot gel before you add coloring. This will help keep bubbling down.
3. Put in the objects that you want on the bottom before you pour. These can help camouflage the wick tab.
4. Pour a layer of gel and add objects, repeating this in layers. Keep objects away from the wick and remember that the closer they are to the outside of the container, the easier they will be seen.
Fleece Blanket
Items you'll need to make a no-sew fleece baby blanket:1. Two pieces of fleece fabric of different patterns.
2. Sharp scissors. The scissors get really dull after this project.
3. Tape
4. Paper clips
How to make a fleece tie baby blanket
1. Go to a fabric store like JoAnn's Fabric, and choose two rolls of fleece fabric that you would like for your blanket. (One blanket uses two pieces of fleece fabric - one for each side; you could use the same pattern on both sides of the blanket. I prefer two different patterns.) The fleeces should be the same except for the pattern. Don't use different thicknesses or textures. You'll also want to make sure the fleece isn't too thick or it will be really difficult to cut.
2. Have an attendant cut your fabrics equally so you don't have to re-cut later. I chose to have each piece of fleece cut to one yard. If you want a larger blanket or smaller blanket, cut accordingly. I thought the one yard size was perfect.
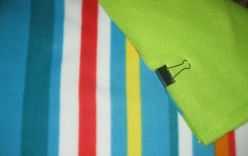
Clip two fabrics together with a paper clip.
3. At home, lay the blankets down evenly on top of each other, and clip them together so they don't move.
4. Choose a side to begin, and fold the two fabrics up about an inch and a half, and use four or five pieces of tape to secure it along this side. Make sure that it is even.
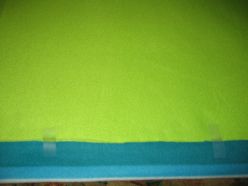
Fold the fabrics up about an inch and a half and tape along one side.
Cut until you reach the top (solid green).
5. Begin cutting along the folded piece up to the edge of where the fold ends. Bring your scissors just past the end of the fold. Make your cuts about an inch apart so your strips will be about an inch in thickness. Continue until you finish the entire side. Be sure to cut evenly.
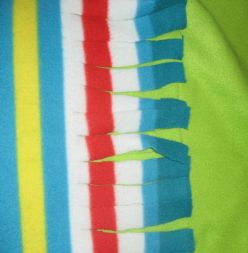
One inch cuts after un-taping it.
6. Begin tying the two fabrics together. The pieces that were cut together are tied together. It's easy to get off a tie, so pay attention so you don't have to go back and untie.
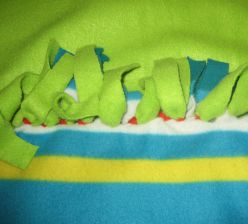
One side tied off.
7. Continue on for the remaining three sides. The corners can be a bit tricky. Cut as you did on the first side and cut off any ties that look awkward on the corners so that you have a right angle.
Heart Necklace
Materials Needed:
Red Clay or Play Dough
Yarn
Heart-Shaped Cookie Cutters
Straw
Instructions:
Roll out the red clay or Play Dough to about 1/2 inch thick. Use the straw to make a small hole along the top of the heart. Let the clay dry out. Lace yarn through the hole, tie, and wear your new necklace with pride, or give it to someone as a gift!
Optional: You can use clear acrylic spray to make the hearts shiny. You can also use glitter, sequins, or other materials.
How to make Play Dough at Home
What you'll need:
1 large bowl
1 cookie sheet
1 rolling pin
1 cup salt
1 1/4 cups warm water
1 mixing spoon or mixer
3 cups flour
1 plastic bag
refrigerator
painting supplies
How to make it:
DAY ONE
Pour 1 cup salt into large bowl.
Add 1 1/4 cups warm water, mix well.
Add 3 cups flour, again mix well.
Knead into ball, seal in plastic bag and refrigerate.
DAY TWO
Take out.
Mold into anything you want!
Set aside.
DAY THREE (if not hard yet, put in oven for awhile)
Paint, if you wish. You may wish to put on cardboard first.
Set aside.
DAY FOUR
You're done!
Notes:
This craft takes 4 days to properly set once you've modeled and painted an object.
As with all recipes, results can vary depending on humidity and other conditions.
Sources
My almond and peppermint lip balm recipes come from:Ponte Vedra Soap Shoppe
My cranberry lip gloss recipe comes from:
CBC / Montreal Matters
"How to Make a Tie Fleece Blanket" comes from:
Robin
"How to Make Gel Candles" comes from:
eHow.com
"Tissue Heart Picture" comes from:
Kid's Craft Club
My heart necklace idea comes from:
Sherri Osborn, About.com
My Play Dough recipe comes from:
Kaboose.com